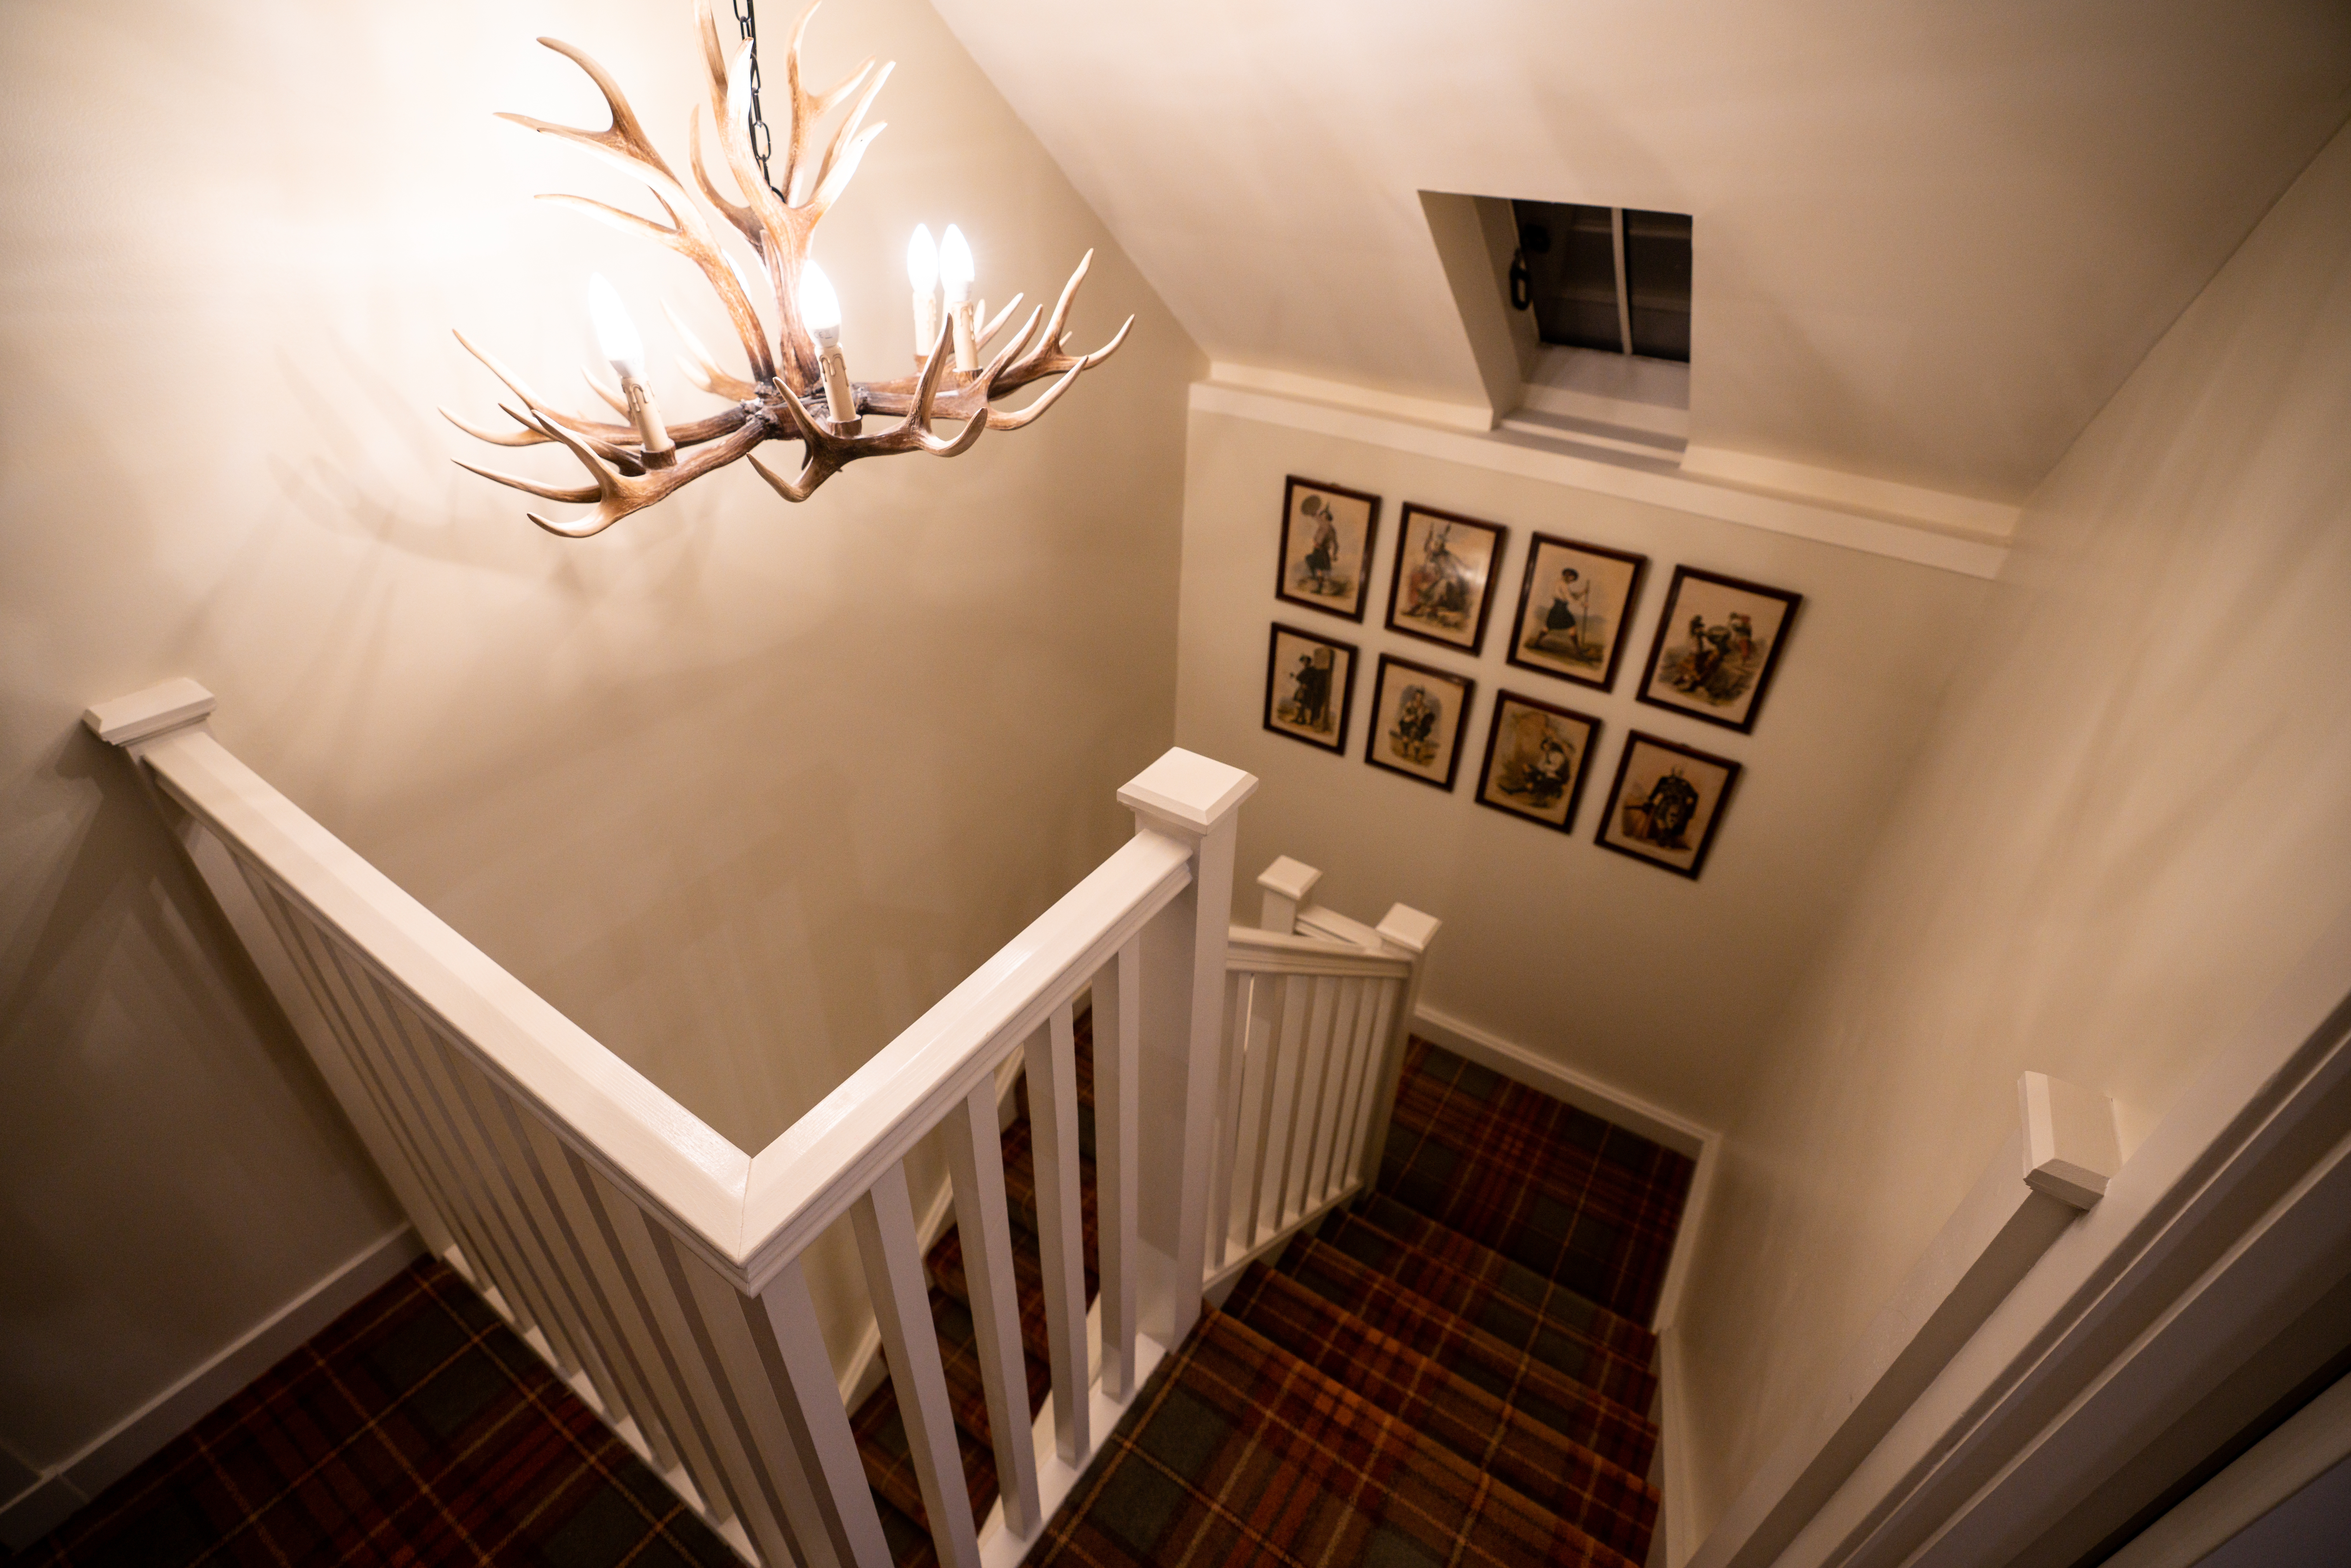
Woodwork is the detail that frames a room. Crisp skirting, clean door frames and a smooth staircase make the whole space look finished, while chipped, yellowed or drippy trim drags everything down, however good the walls are. It is also the part of a decorating job most people rush, which is exactly why it so often goes wrong.
This guide walks through how we approach woodwork at Alan Cox Decorators, from preparation through to the final coat. The principles are the same whether you are tackling a single skirting board yourself or planning a whole-house refresh.

Why woodwork needs a different approach to walls
Walls take emulsion, which is forgiving. Woodwork is a harder, less porous surface that takes knocks, scuffs and cleaning, so it needs a tougher coating and far more careful preparation. Skip the prep and the paint will not bond properly, which is what causes the flaking, chipping and peeling you see on neglected trim.
There is also an order to the job. When you are decorating a full room, paint the woodwork in the same sequence professionals use, so nothing you do later spoils work you have already finished.
| Which order: woodwork first or last? Ceilings → walls → woodwork is the usual professional sequence for a full redecoration. Painting trim last means you cut a clean line against finished walls and avoid wall roller-spray landing on fresh gloss. The common exception is bare new woodwork or a heavy strip-back, where some decorators prime and undercoat the trim first, then paint walls, then apply the trim topcoat last. Either works; the key is that the final woodwork coat goes on after the walls. |
Step 1: Clear the space and protect surfaces
Move furniture away from the walls so you can reach the full run of skirting, and lift or roll back carpet edges where you can. Lay dust sheets along the floor to catch both sanding dust and drips.
Use low-tack painter’s tape where the skirting meets the floor and, if you prefer taped lines, where it meets the wall. Press the edge down firmly so paint cannot bleed underneath, and lift the tape while the paint is still slightly soft rather than waiting until it has fully hardened, which can tear the new film.
Step 2: Clean thoroughly
Woodwork collects grease, dust and general grime, and paint will not stick to a dirty surface. Wash skirting and trim down with sugar soap, paying particular attention to kitchen woodwork, which often carries a film of cooking grease that quietly stops paint adhering. Rinse with clean water and let everything dry completely before going further.
Step 3: Sand for adhesion
Sanding does two jobs: it smooths the surface and it keys it, giving the new paint something to grip. On previously painted woodwork in sound condition, a light rub-down with a medium-fine paper is usually enough to dull the existing sheen. Bare or patchy wood needs a fuller sand, working with the grain, not across it.
Once sanded, wipe everything down with a slightly damp cloth or a tack cloth to lift every trace of dust. Any dust left behind gets sealed into the paint and you will feel it, and see it, in the finished surface. A quick slide of the hand along the wood tells you whether it is genuinely clean and smooth.
| Safety: check for lead on older woodwork Paint on woodwork in properties decorated before around 1992 may contain lead. Disturbing it by dry-sanding or stripping can release harmful dust. If you suspect old lead paint, test first and use safe methods, or have it handled professionally. Period and older homes especially warrant this check. |
Step 4: Seal knots with knotting solution
Knots in bare or newly exposed softwood contain resin that can bleed through paint, leaving brown or yellow patches that reappear even after several coats. Knotting solution seals them so they cannot show through. Brush a thin coat over each knot and let it dry before you prime. It is a thirty-second job that prevents a fault you cannot easily fix later.
Step 5: Prime, then fill and caulk
Bare wood, filler and any stained patches need priming so the topcoat has a uniform, well-sealed base to sit on. On fully bare timber, an appropriate wood primer or primer-undercoat is the foundation of a lasting finish.
There is a small professional habit worth borrowing here: prime before you caulk. Filling and caulking against a primed surface makes the gaps easier to see, helps you spot imperfections in your filler, and stops bare wood drawing moisture out of the caulk too quickly.
Filling versus caulking
These are two different jobs, and using the wrong product is a common mistake. Wood filler is for holes, dents, splits and chips in the timber itself; sand it smooth once dry, and expect deep holes to need a second application. Decorator’s caulk is for gaps, the line along the top of skirting, around architraves, and where trim meets the wall. It stays flexible and is paintable, so smooth the bead with a wet finger or a caulking tool. Keep silicone sealant for wet-area joints such as around a bath; in its standard form it cannot be painted, so it has no place on surfaces you intend to coat.
Step 6: Choose the right paint
Woodwork paint comes in water-based and oil-based (solvent-based) systems. Both can give a beautiful result, and the right choice depends partly on the look you want and partly on where the woodwork is. This is about the paint type; for which sheen level to pick, matte through to gloss, see our separate guide below.
| Water-based wood paint | Oil-based wood paint | |
|---|---|---|
| Colour over time | Whites stay white | White and pale shades tend to yellow over time, worse in low-light spots such as cloakrooms and behind doors |
| Drying / recoat | Fast; often recoatable the same day | Slower; can hold up the rest of the job |
| Odour & cleanup | Low odour; cleans up with water | Stronger solvent smell; needs white spirit |
| Durability | Modern systems cure hard and stay slightly flexible, resisting cracking | Traditionally hard-wearing; the old assumption that it is automatically tougher is now outdated |
Step 7: Apply thin coats and sand between them
The secret to a smooth, professional finish is thin coats, not thick ones. Load the brush no more than about a third of the way up the bristles and wipe off the excess; an overloaded brush is what causes runs and drips. A 2-inch (50mm) angled brush gives good control on most skirting and trim.
Work in manageable sections of around half a metre. Cut in the edges first, then fill the middle, and make your final stroke a light pass along the length of the board so the brush marks run with the wood, not across it. This is what professionals call ‘laying off’.
- Apply the first coat thinly and evenly, and let it dry fully.
- Lightly sand with a fine paper to knock back any raised grain or specks, then wipe off the dust.
- Apply the second coat the same way. Most jobs need two coats over a primed surface for an even, opaque finish.
Always follow the guidance on the tin, as some modern water-based ranges are formulated so you do not need to sand between coats. When in doubt, a light de-nib between coats rarely hurts the result.
Common woodwork mistakes (and how to avoid them)
| Mistake | What happens | How to avoid it |
|---|---|---|
| Skipping the sand and clean | Paint will not bond, then flakes and chips early | Always degrease, sand to key the surface, and remove all dust |
| Not sealing knots | Brown resin stains bleed through the topcoat | Apply knotting solution to every knot before priming |
| Overloading the brush | Runs, drips and sagging on vertical trim | Load lightly; build thin coats; lay off along the grain |
| Using filler where caulk is needed | Rigid filler in a flexing gap cracks and reopens | Filler for holes in wood; flexible caulk for gaps and joints |
| White oil-based paint in dark spots | Yellowing in cloakrooms, behind doors and in hallways | Use a water-based wood paint where colour retention matters |
| Rushing between coats | Soft paint drags, marks and never fully hardens | Let each coat dry fully; de-nib lightly before the next |
When to call a professional
Plenty of homeowners paint their own skirting and get a perfectly good result. It becomes worth bringing in a professional when the scope or the stakes rise: a whole house of woodwork, staircases and spindles that are awkward and time-consuming, old paint that needs stripping back, suspected lead paint, or simply when you want a flawless, hard-wearing finish that lasts and frees up your weekends.
A professional decorator brings the preparation discipline that determines how long the finish lasts, the right products for each surface, and a clean, tidy process. For older and period properties, where original timber and possible lead paint call for extra care, that experience matters even more.
Get a quote for your woodwork
| Want crisp skirting, doors and trim without the hassle? Alan Cox Decorators prepares and paints woodwork to a smooth, hard-wearing finish for homes across Leicester, Loughborough, Coalville, Markfield, Nottingham, Derby and the wider East Midlands. Call 01530 249799 or request a free site survey and itemised quote. We send a clear, itemised quotation by email before any work begins. |